


Building an At-Home Sleep Lab, Part 1
Or, Doing Science on a Budget

I am a big fan of sleep, both as a scientist and a participant. For such a critical piece of our biological function, we actually know relatively little about how it works or how to improve it. As a comparison, consider that we first discovered Rapid Eye Movement (REM) sleep in 1953, the same year we got the double-helix structure of DNA figured out. Since then, DNA has led to the foundation of new fields of study, new treatments, new technologies, and a new age of biological data. In the meantime, sleep research and engineering has progressed much more slowly, to the point that most of our advice for improving sleep still involves diet and lifestyle changes.
I’m writing to you from the childhood bedroom that I shared with my brother years ago, but it’s looking a bit different these days. Over the past few days, I’ve been working to transform the space into an at-home sleep lab. I’ll be documenting the process over the next few weeks as things come together, beginning with building a Faraday Cage.
Step 1: Building a Discount Faraday Cage
Scientific equipment is expensive. As in, prohibitively expensive for a non-professional to purchase lab-grade equipment new from the manufacturer. But when you’re determined to continue in the face of overwhelming expense and lack of funding, that’s the best time to get creative. Here, I’ll document the first steps of my work to build an at-home, human-sized Faraday cage for (hopefully) under $200.
The point of a Faraday cage is to prevent some external electromagnetic fields (EMFs) from infiltrating a given location. As I’ve discussed previously, EEG is extremely prone to noise, and top-tier labs will have entire rooms dedicated to providing a noise-free test space. In order to get good quality sleep recordings and to feel confident with the data, I wanted to build such an enclosure that is large enough to sleep in. Online, you can buy a Faraday curtain designed to go around a bed and block EMFs, but the cheapest ones I saw cost a few thousand dollars and didn’t provide much detail for assessing their quality. So, to keep things affordable, I decided to build one myself using cheaper alternatives that should in theory get the job done.
Build Plan: The Frame
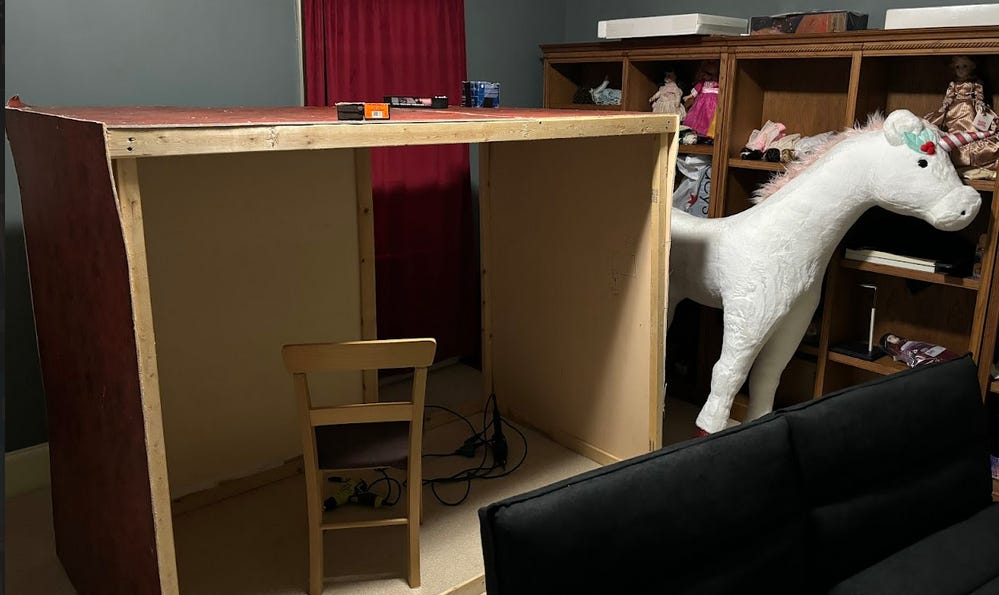
The plan was to build a rectangular frame out of 1 x 1 and 0.5 x 2 inch boards, the sort of lumber available cheap at your local hardware store. Then, we’d attach plywood to five of the faces of the frame, providing us with surfaces to attach metal facing to. Finally, we’d lay an aluminum mesh over the open front face, loose enough to be pulled back and allow entry, but with latches to keep it in solid contact with the rest of the metal box once the sleeper was inside. It wouldn’t be perfectly symmetric, but it should offer improvement over the untreated spaces I’ve been working in until now.

For the wood, I had access to some old stage flats from an indie film set, made of wooden planks and plywood that fit the specs perfectly. It’s a long story of how I got the flats, but the point is that even 8-year-old wood in sub-prime condition worked fine for building the frame. After a bit of sketching and some trial and error, we had a frame that snugly fit around the sofa-bed I would use as the lab’s primary sleeping spot. At the end of the first day, things had moved along pretty well, so I headed home to wait for the metal components to deliver.
Build Plan: The Metal
The frame is an important structural component, but the more critical element is the actual metal that will redistribute those pesky fields that want to ruin the data. As I mentioned, the cost of these materials makes creativity important. There are plenty of quality providers online catering to the scientific world, but real Faraday mesh from certified sellers is expensive, to the order of hundreds of dollars for a few square feet. Doing the math, to build a cage large enough to comfortably sleep in, this would add up fast. An alternative would be to use Faraday fabric, which is a bit cheaper but still expensive. It’s also solid, and the idea of spending 8 hours in a sealed metal box with no air flow struck me as undesirable. I elected to look for cheaper alternatives.
In theory, as long as there is a continuous conductive layer of metal around the space, this should block out some electromagnetic noise. Going into the project I knew that I wouldn’t be able to fully enclose the space (see the previous concern about air flow), but other than the mesh for breathing, I planned to get continuous metal encircling the sleep space as best I could. To this end, I purchased the most cost-effective source of solid conductive metal (aluminum flashing) and the tightest, cheapest aluminum mesh I could find (I went with an aluminum screen for porches, intended to keep out tiny insects). The tightness of the mesh’s weave is proportional to the wavelength it will block, and since I’m mainly interested in long waves, a looser weave should still be fit for purpose. Together, the full cost of the metal ran me about $150, significantly cheaper than the purpose-made material sold online.
Current Status and Next Steps
I admit that I originally hoped to have the whole project done tonight, but unfortunately, the aluminum flashing was lost in the mail and won’t be here until next week. And so, at the end of the second afternoon of building, I have the frame and plywood supports for attaching the metal in place, but no metal and no test data. If all goes well, we should have the full cage up and running by next week, and I’ll be able to say for sure if my DIY solution works!
Once we successfully finish the Faraday cage, we’ll be incorporating a movement tracker in the form of a pressure sensor and/or camera, programming the classifier for handling real-time analyses, and then gathering some sample data over a few nights. After confirming that everything is up and running properly, we’ll be able to move onto testing some simple neurofeedback systems, where changes in the EEG and sleep state will trigger changes to the environment. In the end, our goal is to improve sleep outcomes by incorporating real-time feedback directly from the sleeping brain.
Once we have the first tests up and running, I’ll share further pictures and updates. This should be an exciting and informative project, and if all goes well, the beginning stage of several new, drug-free sleep aids. I’m personally very invested in this one, since I’d love to have the devices I’m working to build!
—
Thank you for reading, and wishing you a night of deep, replenishing sleep,
Patrick Seebold, PhD